This project is very time-consuming, and so much fun to make. The pattern was given to us by our own OZGRAN. And she did a fantastic job coming up with this pattern, and then to share with everyone, what a wonderful lady. So this is my version, with the colors that I want to use in my craft room, and with a slight little twist.
It's hard to tell by the picture, what I did with the painting is I slathered on so much paint just willy-nilly, and not very neat, and made it look like the farmhouse that had paint on paint on paint on paint. I added a little bit of pink in with the white, and then I took antique linen distress ink and edged all around it. I used romance novels paper. And here's the twist. While the tower is on a swivel, at the top( my hubby had an old metal swivel piece, he's had it for years and years and years)
so I took it made a round base added a half inch rim around it using a paper hinge and glue method. Then I took a strip of paper and paper punched the edge, and added it around the round base. So the tower swivels and the Lazy Susan on top swivels. Ie tower is filled with distress inks (whoa is me not very full :( ), and at the top, I put alcohol inks, a distressing handle, and the alcohol solution. Also something that I did on the underside of the distress inks cases, Iput a round sticky Velcro,( the side with the teeth ) and when I take this sponge off the handle I stick it to the bottom of the case and insert it all into the tower, so distress ink and sponge are altogether. Love love love this project.
Tuesday, October 2, 2012
My I'm not a wedding album
So Kathy did a project on paper phenomenon, a wedding album. Mine is not a wedding album, LOL. This was also a very easy project. The fabric you see on the outside used to be white velvet. I took and glimmer misted it to get the color that I wanted.
This is the front, and as you can see on the fabric. Yes, I did use two different colors of glimmer mist. I remember one being Maple and can't remember what the other one was.
This is the front, and as you can see on the fabric. Yes, I did use two different colors of glimmer mist. I remember one being Maple and can't remember what the other one was.
When you open the box up you have a standalone double-sided picture frame
And there are two albums inside the box . They're both shown here ,but what I did was on one album . The pages that have a flap I used a key. On the other album the pages that has flaps, I used the keyhole .So hope you guys like the project and colors that I used, wish I could remember the paper line.
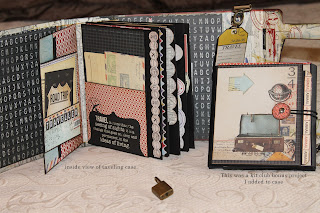
Traveling case
This was a kit club project from paper phenomenon. Love how it turned out
. The only difficulty I had with this project, was trying to take the pictures. Thank goodness there's a lock on the case, as Mr. image kept trying to get inside of it and knocking it over.
And this is showing the inside of the case. There is plenty of room for a lot the pictures. The little booklet on the right was a bonus project for kit club members. I did it up in the same papers and added it to this project.
And still another
I made gentleman crafter's remote caddy. One for myself and one for my husband side of the couch. Valhalla was really impressed with how they turned out, he wanted me to make for more for his employees at work. He also wanted papers to represent each person's personality or what they're interested in. So here's the pictures of ours at home and the ones with employees. Oh, and one of them was a special one for himself the boss in steam punk for work.
This one is Allan's for at home
. This one is mine
this one is for Alan my hubby for at work
and this is the side view
. This one's for woman and she likes exercising a lot . could not find anything . Exercise themed. So what I did this I used this paper and on the side is bike, and all summer long she's always out riding her bike .
This one is for a golfer
This is a side view of the bike and the golfers
This one is for a gentleman who was in the Marine Corps
And this is showing the close-up of the front .
Is says duty, honor , pride .
These are also very easy to make double chipboard and very sturdy .
Next project
My next project was gentleman crafter's rolltop desk. This was a fantastic project, and I love how it turned out.
And this is a side view of the paper I used with Mr. Image getting into the act. I know this project looks really difficult, but it is well written, and very easy to make and with the way that you double, all the chipboard this project is very sturdy. The only thing that I did different is where on the rolltop Jim only uses the chipboard and Kraft paper ,well behind the Kraft paper I also added tyvek.
This is the front view with the front closed and the rolltop down
This is with it rolltop up and the front down and you can see the drawers back in there
. I couldn't get enough of the same drawer pulls so I made it look like a man got in there and just but whatever he could find .. Love the way this look.
And this is a side view of the paper I used with Mr. Image getting into the act. I know this project looks really difficult, but it is well written, and very easy to make and with the way that you double, all the chipboard this project is very sturdy. The only thing that I did different is where on the rolltop Jim only uses the chipboard and Kraft paper ,well behind the Kraft paper I also added tyvek.
Vintage camera
This is a vintage camera that was made from the designs of Laura with following the paper trail.
The black part that you're seeing coming out of the middle of the camera is where tags go in. That's the only part of this project I didn't like, when you put the tags in there's nothing to hold the other side and they sort of tilt.And the edges show but it's a lovely piece put on your mantle for show.
Subscribe to:
Posts (Atom)


